
RPM LIMITER
RPM LIMITER
The Igniter Class uses an RPM Limiter to cap the speed of your motors to the ideal racing speed. Installing this RPM Limiter is necessary for your Igniters to be made legal. This is how you do it:
The Igniter Class uses an RPM Limiter to cap the speed of your motors to the ideal racing speed. Installing this RPM Limiter is necessary for your Igniters to be made legal. This is how you do it:
IMPORTANT NOTE
If you are planning on attending Igniter races this year, please fill out this form so you can get notified of critical spec updates.
Please note: This will NOT put you on our promotional email list. By filling out this form, you will ONLY receive critical rules updates to the spec.
BEFORE YOU START
It is a good idea to start with a good CLI dump for your board from Betaflight 4.4.2, which may or may not be from Kaack. This will drastically speed up flash time, but it isn't strictly necessary.
FLASHING THE RPM LIMITER
As of Nov 15, 2025, we are using Betaflight 4.5 Kaack. You will need to update your firmware if you have not yet.
WRITTEN STEPS
For those familiar with Betaflight, this may cover all the information you need. If you need more help, feel free to reach out on our Facebook, Discord, or Messenger Community Chat.
Step 1 (Optional)
Get a dump of your current firmware (if you have your preferred settings/rates already in it).
Step 2
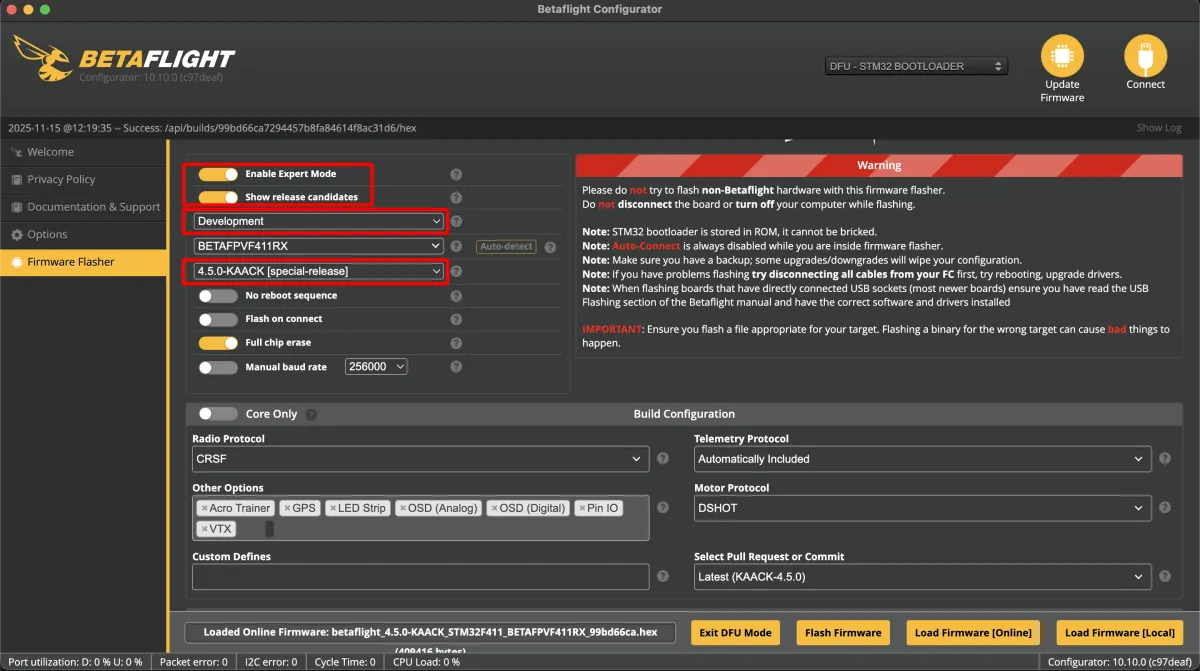
Flash the new hex. Use 4.5 Kaack Special Release. Start by putting your FC into Bootloader mode with the CLI command "BL". Then enable expert mode and show release candidates, select "Development", select your board target (It was "BETAFPVF411RX" for me. Yours will likely be different), and select 4.5 Kaack.
Please Note: On versions of Betaflight 4.5 or newer, the code is stricter about smart audio. For this reason, not all VTX's that use smart audio will have smart audio work when you flash newer versions of Betaflight like 4.5 Kaack. To fix this, put "NONCOMPLIANT_SMARTAUDIO" in the Custom Defines while flashing, which will allow VTX's that fall outside of the stricter guidelines to continue working.
Step 3 (Optional)
Put your dump in your CLI. You can ignore any errors, this step is optional anyway. All of the spec required settings will come later.
Step 4
Properly set up your motor tab by selecting DSHOT300 and set motor poles to 12. This CLI can help you do it quickly:
set motor_pwm_protocol = DSHOT300
set motor_poles = 12
save
Step 5
When you plug your quad in to fly, before arming, center both sticks and Yaw all the way left and Pitch all the way forward to enter the Betaflight menu in your OSD. Use your sticks to navigate to the "spec" menu item and then select "Tiny Trainer".
Step 6 (Troubleshooting)
Just to make sure your quad works properly, there are some things you'll want to look at. First, make sure your quad has bidirectional dshot turned on in the motors tab or your quad will not be able to take off. Make sure your CPU load is low, primarily by using DSHOT300 and using a low PID Loop Frequency in your configuration. If your CPU load is too high, your quad might act up.
If you're coming from a good flash and use the dump, none of these things should be an issue as these settings should all be in your dump.